HP DeskJet GT 5810, 5820 printers - Blinking lights and 'E' errors
HP DeskJet GT 5810, 5820 printers - Blinking lights and 'E' errors
This document is for HP DeskJet GT 5810, 5811, 5820, 5821, and 5822
All-in-One printers.
The following sections describe the most common error conditions with
combinations of blinking (flashing) lights displayed on the control panel,
followed by solutions for each combination. Find the blinking lights
pattern you are experiencing, and then follow the steps to resolve the
issue.
|
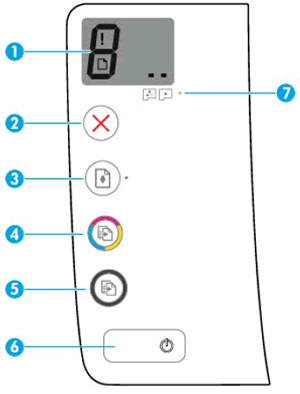
HP DeskJet GT 5810
|
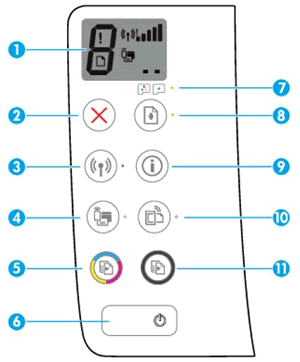
HP DeskJet GT 5820
|
|
|
|
HP DeskJet GT 5810
|
HP DeskJet GT 5820
|

|
|
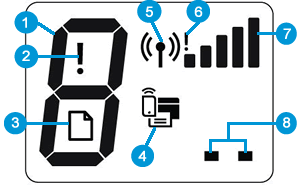
Wireless light blinks, and the Wireless icon and Wireless Attention icon are on
This condition occurs when the wireless connection is on, but the printer
cannot find a wireless signal.

Step 1: Wait for the printer to establish a connection
The Wireless light blinks when the printer is attempting to connect to
the wireless router or access point. Wait a few minutes, and then
check the light again.
-
If the printer establishes a connection, you can stop troubleshooting.
-
If the Wireless light continues to blink, continue to the next step.
Step 2: Check for issues with the wireless network
The following factors can cause the printer to lose the wireless
connection:
-
The network connection is no longer active, or has low signal strength.
-
The printer goes into sleep mode or standby mode.
-
The printer is either too far away from the wireless router, or too close to it. The recommended distance between the printer and the router is 1.0 meter to 1.5 meters (3 ft to 5 ft).
-
A firewall prevents the printer from accessing the computer and wireless network.
-
A nearby device that emits radio signals (such as a microwave or cordless telephone) might interfere with the wireless connection.
-
A virtual private network (VPN) prevents the printer from accessing the computer and wireless network.
If you corrected any of the items in the list and enabled the printer to establish a connection, you can stop troubleshooting.
Step 3: Connect the printer to your network
For more information about connecting the printer to the wireless
network by installing the printer software, go to HP DeskJet 5820
Printers - Wireless Printer Setup (Windows) or HP DeskJet
5820 Printer - Wireless Printer Setup (OS X)
Wireless light blinks, the Wireless icon is on, and the Wireless Attention icon blinks
This condition occurs when the printer cannot connect to your network.

Step 1: Wait for the printer to establish a connection
The Wireless light blinks slowly when
attempting to connect to the wireless router or access point. Wait a
few minutes, and then check the light again.
-
If this step resolved the issue, you can stop troubleshooting.
-
If the issue persists, continue to the next step.
Step 2: Check for issues with the wireless network
The following factors can cause the printer to lose the wireless
connection:
-
The network connection is no longer active, or has low signal strength.
-
The printer goes into sleep mode or standby mode.
-
The printer is either too far away from the wireless router, or too close to it. The recommended distance between the printer and the router is 1.0 meter to 1.5 meters (3 ft to 5 ft).
-
A firewall prevents the printer from accessing the computer and wireless network.
-
A nearby device that emits radio signals (such as a microwave or cordless telephone) might interfere with the wireless connection.
-
A virtual private network (VPN) prevents the printer from accessing the computer and wireless network.
If you corrected any of the items in the list and enabled the printer to establish a connection, you can stop troubleshooting.
Step 3: Connect the printer to your network
For more information about connecting the printer to the wireless
network by installing the printer software, go to HP DeskJet 5820
Printers - Wireless Printer Setup (Windows) or HP DeskJet
5820 Printer - Wireless Printer Setup (OS X)
'Error A' displays
The printer is silent and an A blinks on the printer control
panel.
The printer printed an alignment page and is waiting to scan the page and
complete the alignment.
-
Lift the scanner lid.
-
Place the alignment page with the print side down on the scanner glass, and then position it according to the engraved guides around the glass.
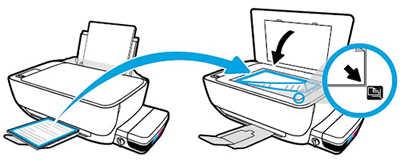
-
Close the scanner lid.
-
On the control panel, press the Start Copy Color button
 .
.
'Error P' displays
After installing the printheads, the printer is silent and
a P blinks on the printer control panel.
The printer was interrupted while priming the ink system. Press and hold
the Resume button for 3 seconds to continue the priming process. The
priming process might take as long as 45 minutes, but you can still print,
scan, and copy. For more information, go to A Blinking 'P' Error
Displays.
One or both printhead icons, Error icon, and Printhead Alert light blink
This condition occurs when there is a problem related to the printheads.
Go to one of the following documents to reseat or replace the printheads.
-
If the printheads are new, and have not been primed or printed from, go to 'Incompatible' or 'Ink Cartridges Missing' Error.
-
If the printheads have already been primed and used, go to Replacing Printheads.
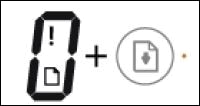
Error icon, Paper Error icon, and the Resume light are on
This condition occurs when there is no paper in the input tray. Load the
printer with plain paper to resolve the issue.
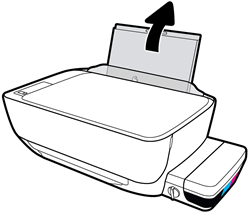
-
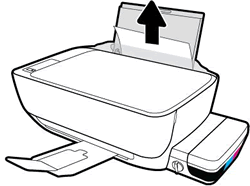
Raise the input tray.
-
Slide the paper width guide all the way to the left.
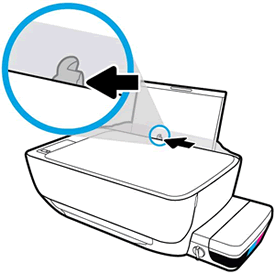
-
Load plain paper into the input tray, and then slide the stack of paper down until it stops.

CAUTION:
Do not load paper while the printer is printing. Jams or paper feed issues might occur. -
Slide the paper width guide to the right until it stops at the edge of the paper.
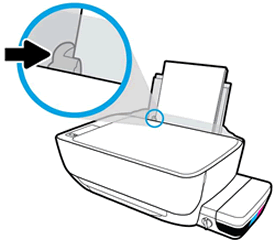
-
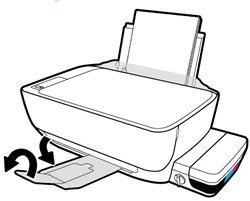
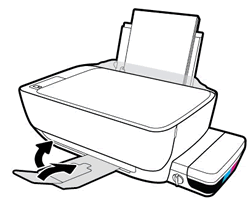
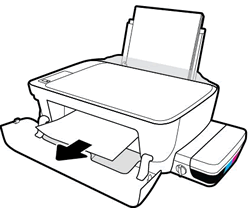
Pull out the output tray, and then raise the tray extender.
HP ePrint light blinks
This condition occurs when HP ePrint is turned on, but the printer is not
connected to the Web Services server.
Turn on Web Services, and then set up automatic printer updates to make
sure your printer has the most up-to-date functionality. Periodic printer
updates are required to use HP ePrint Web Services.
-
Load plain paper in the paper tray.
-
On the printer control panel, press the Wireless
 and the Information
  buttons at the same time.
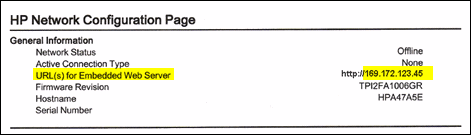
A Network Configuration Page prints.
buttons at the same time.
A Network Configuration Page prints. -
Under the General Information section, find the IP address. It is listed as URL(s) for Embedded Web Server.
-
Open a new web browser window or tab.
-
Type the IP address in your web browser's address bar, and then press Enter. The Embedded Web Server (EWS) opens.
-
From the Home tab, click Web Services.
-
Under the Web Services Settings section, click Setup, and then click Continue.
-
Check both boxes to accept the terms of use and turn on Web Services, and then click Next. The printer searches for updates, and then automatically prints a Web Services information page.
NOTE:
Go to HP Customer Support, enter your printer model, and then search for Print with HP ePrint for the document on how use the ePrint service to print remotely.
'Error 1' displays and the Resume light blinks
An E1 error occurs when the paper settings in the print driver
do not match the paper loaded in the printer.
Go to HP Customer Support, enter your printer model, and then search
for Paper Mismatch for the document on how
resolve the issue.
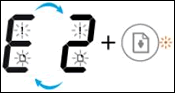
'Error 2' displays
An E2 error occurs when the printer attempts to print a
single-page or multi-page print job, and the paper length selected in the
print settings does not match the length of the loaded paper. The first
page prints with errors.
NOTE:The Error icon, Paper Error icon, and Resume light blink when a multi-page print job is attempted.
-
Press the Cancel button
 to cancel the print job or clear the error.
-
Go to HP Customer Support, enter your printer model, and then search for Print settings guide for the document on how set the paper size in Windows and Mac.
'Error 3' displays and the Resume light blinks
An E3 error occurs when there is a printer carriage jam.

Step 1: Look for jammed paper
Paper jams can occur in multiple areas of the printer. If you cannot
find the paper jam in one area, continue to the next area until the
jam is located.
You might need a flashlight to complete some of these steps.
Clear jammed paper from the input tray
Remove any jammed paper from the input tray.
-
Press the Cancel button to try and automatically clear the paper jam.
If the paper jam error persists, continue these steps to manually clear the jam.
-
Gently remove any jammed paper and bits of torn paper from the input tray. To avoid tearing any whole sheets of paper, pull the paper with both hands.
-
Shine light from a flashlight inside the input tray opening and look for torn pieces of paper that remain inside the printer. Remove any paper you find to prevent more jams.
-
Use your fingers to move the pick mechanism located inside the input tray and look for any foreign objects or debris that might have fallen inside the printer. Remove any foreign objects you find to prevent more jams.
-
Reload the input tray with new paper.
-
Press the Resume button on the printer control panel to continue the current print job.
If the error persists, check for jammed paper in another area
of the printer.
Clear jammed paper from the output tray
Remove any jammed paper from the output tray.
-
Press the Cancel button to try and automatically clear the paper jam.
If the paper jam error persists, continue these steps to manually clear the jam.
-
Gently remove any jammed paper and bits of torn paper from the output tray. To avoid tearing any whole sheets of paper, pull the paper with both hands.

-
Shine light from a flashlight inside the output tray opening and look for torn pieces of paper that remain inside the printer. Remove any paper you find to prevent more jams.
-
Press the Resume button on the printer control panel to continue the current print job.
If the error persists, check for jammed paper in another area
of the printer.
Clear jammed paper from the printhead access area
Remove any jammed paper from the printhead access area.
-
Press the Cancel button to try and automatically clear the paper jam.
If the paper jam error persists, continue these steps to manually clear the jam.
-
Turn off the printer, and then disconnect the power cord.
WARNING:
Disconnect the power cord before reaching inside the printer to avoid risk of injuries or electric shock. -
Disconnect the USB cable from the rear of the printer, if it is connected.
-
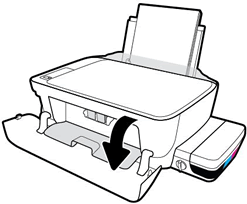
Close the output tray extender, and then push the output tray into the printer.
-
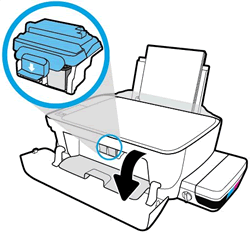
Open the exterior door, and then open the printhead access door.
-
If the carriage is in the center of the printer, gently slide it to the right.
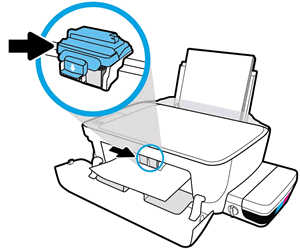
CAUTION:
Do not touch the printhead latch when moving the carriage. Accidentally opening the latch can result in damage to the ink system.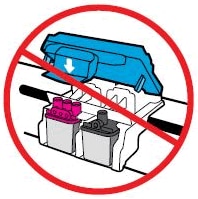
-
Gently remove any jammed paper from inside the printer.
-
Shine light from a flashlight inside the printhead access area and look for torn pieces of paper that remain inside the printer. Remove any paper you find to prevent more jams.
-
Close the printhead access door.
-
Close the exterior door.
-
Pull out the output tray, and then the tray extender.

-
Reconnect the power cord to the rear of the printer, and then turn on the printer.
-
Turn on the printer.
Try to print. If the error persists, check for jammed paper in
another area of the printer.
Clear jammed paper from underneath the printer
Only perform these steps if printer continues to report a paper
jam after clearing jammed paper from the input and output trays
and printhead access area.
These steps require turning the printer on its front or rear, and
might result in ink leakages.
-
Press the Cancel button to try and automatically clear the paper jam.
If the paper jam error persists, continue these steps to manually clear the jam.
-
Turn off the printer, and then disconnect the power cord.
WARNING:
Disconnect the power cord before reaching inside the printer to avoid risk of injuries or electric shock. -
Disconnect the USB cable from the rear of the printer, if it is connected.
-
Lower the paper input tray back into the printer, close the output tray extender, and then push the output paper tray into the printer.
-
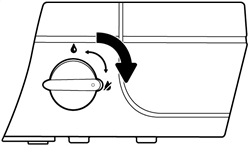
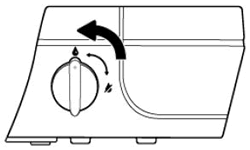
Lock the ink valve.
-
Make sure the ink tank plugs are inserted and secure.

-
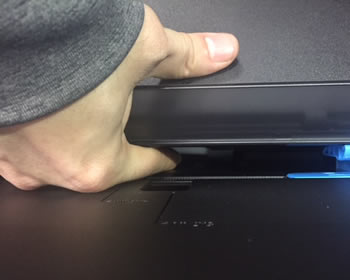
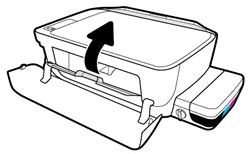
While using one hand to hold the scanner lid, slowly lift the printer, and then rest it on its back so that you can access its underside (base).
CAUTION:
Do not turn the printer on its side! Turning the printer on its right or left side can cause ink to leak. -
Pull the tabs on either side of the cleanout door to open it.
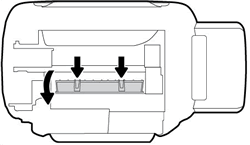
-
Gently remove any jammed paper and from inside the printer.

-
Shine light from the flashlight inside the opening and look for torn pieces of paper or foreign objects that remain inside the printer. Remove any paper or foreign objects you find to prevent more jams.
-
Close the cleanout door. Gently push the door forward until it snaps into place.

-
Return the printer to its normal position.
-
Unlock the ink valve.
-
Reconnect the USB cable if necessary.
-
Reconnect the power cord to the rear of the printer, and then turn on the printer.
Try to print. If the error persists, check for jammed paper in
another area of the printer.
If you have checked and removed any jammed paper from each printer
area and the error persists, continue to the next step.
Step 2: Make sure the carriage moves freely
To make sure there are no foreign objects or paper in the printer,
move the carriage across the width of the printer.
-
Turn on the printer, if it is not already on.
-
Open the exterior door, and then open the printhead access door.
-
Wait until the carriage is idle and silent before you continue.
-
With the printer turned on, disconnect the power cord from the rear of the printer.
WARNING:
You must unplug the power cord to move the carriage by hand and reset the paper feed mechanism without the risk of electrical shock. -
Use a flashlight to check for any paper or objects that might be restricting the carriage, and then remove any paper or objects that you find.
CAUTION:
If the paper tears when you remove it from the rollers, check the rollers and wheels for torn pieces of paper that might remain inside the printer. If pieces of paper remain in the printer, more paper jams can occur. -
Reach inside the printer through the printhead access door, and then manually move the carriage.
-
If the carriage is stuck on the right side of the printer, move the carriage to the left side of the printer.
-
If the carriage is stuck on the left side of the printer, move the carriage to the right side of the printer.
-
If the carriage is stuck in the middle of the printer, move the carriage to the right side of the printer.
CAUTION:
Do not touch the printhead latch when moving the carriage. Accidentally opening the latch can result in damage to the ink system.
-
-
Remove any loose paper or obstructions you find.
-
Make sure the carriage can move freely across the width of the printer. Firmly push the carriage to the left side of the printer, and then to the right side.
-
Close the printhead access door, and then close the exterior door.
-
Reconnect the power cord to the rear of the printer, and then turn on the printer.
Try to print. If the error persists, continue to the next step.
Step 3: Plug the printer directly into a wall outlet
Make sure there is not a power issue from a power strip or surge
protector.
-
Disconnect the power cord from the rear of the printer.
-
Unplug the power cord from any power strips or surge suppressors.
-
Plug the power cord directly into an electrical outlet.
-
Reconnect the power cord to the rear of the printer.
-
Turn on the printer.
Try to print. If the error persists, continue to the next step.
Step 4: Reset the printer
Resetting the printer can clear carriage jam errors.
-
With the printer turned on, disconnect the power cord from the printer.
-
Unplug the power cord from the power source.
-
Wait 60 seconds.
-
Reconnect the power cord to a wall outlet and to the printer.
NOTE:
HP recommends plugging the printer directly into a wall outlet.
Try to print. If the error persists, continue to the next step.
Step 5: Service the printer
If you have completed all the previous steps and the issue persists,
continue to the Service the printer section
at the end of this document.
'Error 4' displays, and the Paper Error icon, Resume light, and Printhead Alert light blink
An E4 error occurs when there is a paper jam.
Paper jams can be real or false. The printer might report a paper jam even
when there is no jammed paper. The following steps apply to both real and
false paper jams.

Step 1: Look for jammed paper
Paper jams can occur in multiple areas of the printer. If you cannot
find the paper jam in one area, continue to the next area until the
jam is located.
Clear jammed paper from the input tray
Remove any jammed paper from the input tray.
-
Press the Cancel button to try and automatically clear the paper jam.
If the paper jam error persists, continue these steps to manually clear the jam.
-
Gently remove any jammed paper and bits of torn paper from the input tray. To avoid tearing any whole sheets of paper, pull the paper with both hands.
-
Shine light from a flashlight inside the input tray opening and look for torn pieces of paper that remain inside the printer. Remove any paper you find to prevent more jams.
-
Use your fingers to move the pick mechanism located inside the input tray and look for any foreign objects or debris that might have fallen inside the printer. Remove any foreign objects you find to prevent more jams.
-
Reload the input tray with new paper.
-
Press the Resume button on the printer control panel to continue the current print job.
If the error persists, check for jammed paper in another area
of the printer.
Clear jammed paper from the output tray
Remove any jammed paper from the output tray.
-
Press the Cancel button to try and automatically clear the paper jam.
If the paper jam error persists, continue these steps to manually clear the jam.
-
Gently remove any jammed paper and bits of torn paper from the output tray. To avoid tearing any whole sheets of paper, pull the paper with both hands.
-
Shine light from a flashlight inside the output tray opening and look for torn pieces of paper that remain inside the printer. Remove any paper you find to prevent more jams.
-
Press the Resume button on the printer control panel to continue the current print job.
If the error persists, check for jammed paper in another area
of the printer.
Clear jammed paper from the printhead access area
Remove any jammed paper from the printhead access area.
-
Press the Cancel button to try and automatically clear the paper jam.
If the paper jam error persists, continue these steps to manually clear the jam.
-
Turn off the printer, and then disconnect the power cord.
WARNING:
Disconnect the power cord before reaching inside the printer to avoid risk of injuries or electric shock. -
Disconnect the USB cable from the rear of the printer, if it is connected.
-
Close the output tray extender, and then push the output tray into the printer.
-
Open the exterior door, and then open the printhead access door.
-
If the carriage is in the center of the printer, gently slide it to the right.
CAUTION:
Do not touch the printhead latch when moving the carriage. Accidentally opening the latch can result in damage to the ink system.
-
Gently remove any jammed paper from inside the printer.
-
Shine light from a flashlight inside the printhead access area and look for torn pieces of paper that remain inside the printer. Remove any paper you find to prevent more jams.
-
Close the printhead access door.
-
Close the exterior door.
-
Pull out the output tray, and then the tray extender.
-
Reconnect the power cord to the rear of the printer, and then turn on the printer.
-
Turn on the printer.
Try to print. If the error persists, check for jammed paper in
another area of the printer.
Clear jammed paper from underneath the printer
Only perform these steps if printer continues to report a paper
jam after clearing jammed paper from the input and output trays
and printhead access area.
These steps require turning the printer on its back, and might
result in ink leakages.
-
Press the Cancel button to try and automatically clear the paper jam.
If the paper jam error persists, continue these steps to manually clear the jam.
-
Turn off the printer, and then disconnect the power cord.
WARNING:
Disconnect the power cord before reaching inside the printer to avoid risk of injuries or electric shock. -
Disconnect the USB cable from the rear of the printer, if it is connected.
-
Lower the paper input tray back into the printer, close the output tray extender, and then push the output paper tray into the printer.
-
Lock the ink valve.
-
Make sure the ink tank plugs are inserted and secure.
-
While using one hand to hold the scanner lid, slowly lift the printer, and then rest it on its back so that you can access its underside (base).
CAUTION:
Do not turn the printer on its side! Turning the printer on its right or left side can cause ink to leak. -
Pull the tabs on either side of the cleanout door to open it.
-
Gently remove any jammed paper and from inside the printer.
-
Shine light from the flashlight inside the opening and look for torn pieces of paper or foreign objects that remain inside the printer. Remove any paper or foreign objects you find to prevent more jams.
-
Close the cleanout door. Gently push the door forward until it snaps into place.
-
Return the printer to its normal position.
-
Unlock the ink valve.
-
Reconnect the USB cable if necessary.
-
Reconnect the power cord to the rear of the printer, and then turn on the printer.
Try to print. If the error persists, check for jammed paper in
another area of the printer.
If you have checked and removed any jammed paper from each printer
area and the error persists, continue to the next step.
Step 2: Make sure the carriage moves freely
To make sure there are no foreign objects or paper in the printer,
move the carriage across the width of the printer.
-
Turn on the printer, if it is not already on.
-
Open the exterior door, and then open the printhead access door.
-
Wait until the carriage is idle and silent before you continue.
-
With the printer turned on, disconnect the power cord from the rear of the printer.
WARNING:
You must unplug the power cord to move the carriage by hand and reset the paper feed mechanism without the risk of electrical shock. -
Use a flashlight to check for any paper or objects that might be restricting the carriage, and then remove any paper or objects that you find.
CAUTION:
If the paper tears when you remove it from the rollers, check the rollers and wheels for torn pieces of paper that might remain inside the printer. If pieces of paper remain in the printer, more paper jams can occur. -
Reach inside the printer through the printhead access door, and then manually move the carriage.
-
If the carriage is stuck on the right side of the printer, move the carriage to the left side of the printer.
-
If the carriage is stuck on the left side of the printer, move the carriage to the right side of the printer.
-
If the carriage is stuck in the middle of the printer, move the carriage to the right side of the printer.
CAUTION:
Do not touch the printhead latch when moving the carriage. Accidentally opening the latch can result in damage to the ink system.
-
-
Remove any loose paper or obstructions you find.
-
Make sure the carriage can move freely across the width of the printer. Firmly push the carriage to the left side of the printer, and then to the right side.
-
Close the printhead access door, and then close the exterior door.
-
Reconnect the power cord to the rear of the printer, and then turn on the printer.
Try to print. If the error persists, continue to the next step.
Step 3: Clean the paper rollers
Use an automated utility to clean the paper feed rollers inside the
printer.
-
Turn on printer.
-
Remove paper from the input tray.
-
Press and hold the Power button, press the Cancel button three times, press the Start Copy
Color button seven times, and then release the
Power button.
The printer makes mechanical noises. Wait until the printer is idle and silent before you proceed.
Try to print. If the error persists, continue to the next step.
Step 4: Clean ink smears
Cleaning ink smears can help clear paper jams and optimize print
quality.
-
Press and hold the Power button, press the Cancel button three times, press the Start Copy
Color button eight times, and then release the
Power button.
The printer feeds one page slowly and makes mechanical noises.
-
Wait until the printer is idle and silent before you proceed.
Try to print. If the error persists, continue to the next step.
Step 5: Manually clean the paper rollers inside the input tray area
Dust, paper fiber, and other debris might accumulate on the paper feed
rollers and cause paper jams and paper feed issues.
-
Turn off the printer, and then disconnect the power cord.
WARNING:
Disconnect the power cord before reaching inside the printer to avoid risk of injuries or electric shock. -
Disconnect the USB cable, if it is connected.
-
Raise the input tray.
-
Lift and hold the input tray shield.
NOTE:
Do not remove the input tray shield. The input tray shield prevents foreign debris from falling into the paper path and causing paper jams. -
Use a flashlight to look through the open input tray and find the gray paper pick rollers.
-
Dampen a long cotton swab with bottled or distilled water, and then squeeze any excess water from the swab.
-
Press the swab against the rollers, and then rotate them upward with your fingers. Apply a moderate amount of pressure to remove dust or dirt buildup.
-
Lower the input tray shield.
-
Allow the rollers to dry (approximately 10 minutes).
-
Reconnect the USB cable to the printer if necessary.
-
Reconnect the power cord to the rear of the printer, and then turn on the printer.
Try to print. If the error persists, continue to the next step.
Step 6: Reset the printer
Sometimes a paper jam error persists even though there is no jammed
paper (false paper jam). Reset the printer, which might clear a false
paper jam error.
-
With the printer turned on, disconnect the power cord from the printer.
-
Unplug the power cord from the power source.
-
Wait 60 seconds.
-
Reconnect the power cord to a wall outlet and to the printer.
NOTE:
HP recommends plugging the printer directly into a wall outlet.
Try to print. If the error persists, continue to the next step.
Step 7: Service the printer
If you have completed all the previous steps and the issue persists,
continue to the Service the printer section
at the end of this document.
'Error 5' displays and all lights on the control panel blink
An E5 error occurs when the printer experiences a scanning
error.


Turn the printer off and on again to resolve a scanning error. If you were
not scanning when the error occurred, skip to the Service the
printer section at the end of this document.
NOTE:The printer still prints even if the scan feature is unavailable.
-
Turn off the printer.
-
Wait at least 15 seconds.
-
Turn on the printer.
-
Check the lights on the control panel to make sure they no longer blink.
-
Attempt to scan the item again.Go to HP Customer Support, enter your printer model, and then search for Scanner not found or connected for the document on how resolve connection issues.
'Error 6' displays and all the lights blink
An E6 error occurs when the printer is in an error state.


Step 1: Reset the printer
Resetting the printer can clear the error state.
-
With the printer turned on, disconnect the power cord from the printer.
-
Unplug the power cord from the power source.
-
Wait 60 seconds.
-
Reconnect the power cord to a wall outlet and to the printer.
NOTE:
HP recommends plugging the printer directly into a wall outlet.
Step 2: Plug the printer directly into an electrical outlet
Plug the product directly into an electrical outlet to make sure that
the power source functions correctly.
-
Disconnect the power cord from the rear of the product.
-
Unplug the power cord from any power strips or surge suppressors.
-
Plug the power cord directly into an electrical outlet.
-
Reconnect the power cord to the rear of the product.
-
Press the Power button to turn on the product.
-
Try the task again.If the issue persists, try a different electrical outlet.
Step 3: Service the printer
If you have completed all the previous steps and the issue persists,
continue to the Service the printer section
at the end of this document.
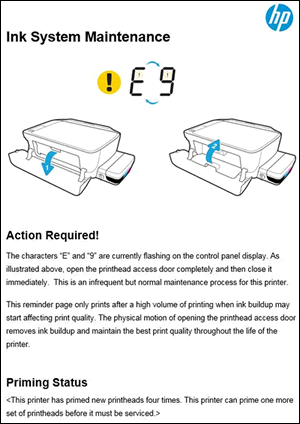
'Error 9' displays and an Ink System Maintenance page prints
An E9 error occurs when the printer detects that ink system
maintenance is required.

The Ink System Maintenance page that prints with the error contains
instructions to resolve the error.
-
Open the printhead access door, and then close it immediately.
CAUTION:
Do not open the printhead latch. Accidentally opening the latch can result in damage to the ink system.
A mechanical process begins to help remove ink buildup and maintain print quality. -
Read the information under the Priming Status heading. The information states how many times the printer has primed new printheads and when it requires servicing.
https://support.hp.com/


Comments
Post a Comment