HP DeskJet GT 5810, 5820 Printers - A Blinking 'P' Error Displays
HP DeskJet GT 5810, 5820 Printers - A Blinking 'P' Error Displays
This document is for HP DeskJet GT 5810, 5811, 5820, 5821, and 5822
All-in-One printers.
After installing the printheads, the printer displays a
blinking P from the control panel, which indicates that you can
start the ink priming process. Before starting the priming process, make
sure all the ink tanks are full, the printheads are installed correctly,
and paper is loaded in the input tray.
Step 1: Make sure the ink tanks are full
Before you start the priming process, make sure there is enough ink in
every tank. The ink levels should be within the maximum and minimum fill
lines on the ink tank.

-
Maximum fill line
-
Minimum fill line
Step 2: Make sure the printheads are properly installed
Install the printheads properly. If you have already installed the printheads, skip to the next step.
CAUTION:Very Important! Do not open the blue carriage latch after printhead installation. Opening the latch might result in severe ink system errors.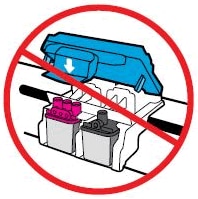
-
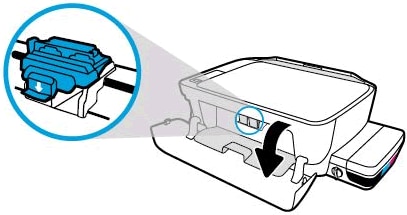
With the printer turned on, open the exterior door, and then open the printhead access door.The printhead carriage moves to the center of the printer.
-
Install the printheads.
-
Insert the black printhead into the right slot.
-
Insert the tri-color printhead into the left slot.

-
-
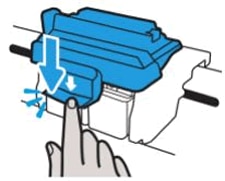
Close the blue carriage latch by pushing down firmly until the latch snaps into place.
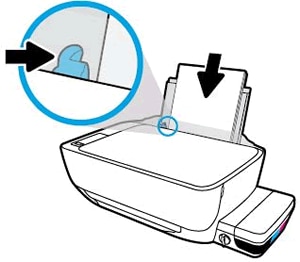
Step 3: Load paper
Load plain white paper in the input tray.
-
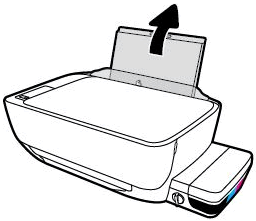
Raise the input tray.
-
Slide the paper width guide all the way to the left.

-
Load plain white paper into the input tray, slide the stack of paper down until it stops, and then slide the paper width guide against the edge of the paper.
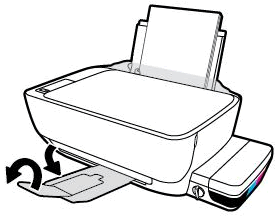
-
Pull out the output tray, and then raise the tray extender.
Step 4: Confirm that the printer can start the printing process
After you verify that there is sufficient ink in the tanks, the printhead
is latched, and paper is loaded, align the printer and then start the
priming process. The priming process might take as long as 45 minutes, but
you can still install the software and print, scan, and copy while the
printer is priming.
-
On the printer control panel, press and hold the Resume button
 for 3 seconds to start the priming process.
The printer prints an alignment page.
for 3 seconds to start the priming process.
The printer prints an alignment page.
-
Lift the scanner lid.
-
Place the alignment page with the print side down on the right-front corner of the scanner glass, and then close the scanner lid. Position it according to the engraved guides around the scanner glass.
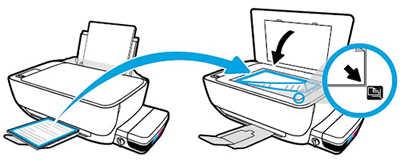
-
Close the scanner lid.
-
On the control panel, press the Start Copy Color button
 .
.
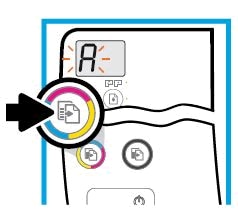 The printer aligns the printheads.
Priming is complete when the rotating lines stop and
a 0 displays on the control panel.
https://support.hp.com/


Comments
Post a Comment