HP DeskJet GT 5810, 5820 Printers - Loading Paper and Envelopes
HP DeskJet GT 5810, 5820 Printers - Loading Paper and Envelopes
This document is for HP DeskJet GT 5810, 5811, 5820, 5821, and 5822
All-in-One printers.
This document provides instructions for loading plain paper, photo paper,
and envelopes into the printer.
Load plain paper
Load plain paper into the printer for basic printing tasks.
-
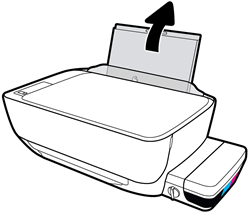
Raise the input tray.
-
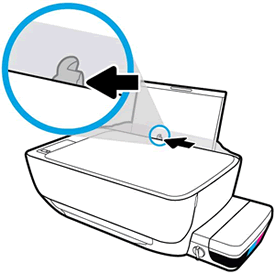
Slide the paper width guide all the way to the left.
-
Load plain paper into the input tray, and then slide the stack of paper down until it stops.

CAUTION:
Do not load paper while the printer is printing. Jams or paper feed issues might occur. -
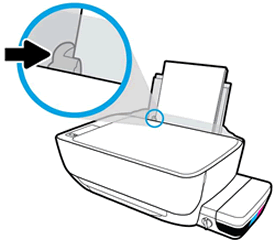
Slide the paper width guide to the right until it stops at the edge of the paper.
-
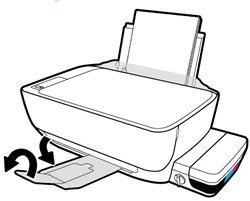
Pull out the output tray, and then raise the tray extender.
Load photo paper
Load photo paper into the printer to print high-quality photographs.
-
Raise the input tray.Figure : Raising the input tray
-
Slide the paper width guide all the way to the left.Figure : Sliding the paper width guide left
-
Load a stack of photo paper into the input tray with the short edge down and the print side up.Slide the stack of paper in until it stops.
NOTE:
If the photo paper you use has perforated tabs, load the paper so that the tabs are on top.Figure : Loading photo paper
CAUTION:
Do not load photo paper while the printer is printing. Jams or paper feed issues might occur. -
Slide the paper width guide to the right until it stops at the edge of the photo paper.
NOTE:
Do not leave any photo paper in the input tray after you finish printing, as the quality of the paper might deteriorate. Store photo paper in a sealed bag in a cool, dark place.Figure : Sliding the paper width guide right
-
Pull out the output tray, and then raise the tray extender.Figure : Pulling out the output tray, and then raising the tray extender

Load envelopes
Load the printer with blank envelopes to print addresses for the recipient
and the sender.
NOTE:You can load one or more envelopes in the tray, but do not load more than five envelopes at a time. Do not use shiny or embossed envelopes or envelopes that have clasps or windows.
-
Raise the input tray.Figure : Raising the input tray
-
Slide the paper width guide all the way to the left.Figure : Sliding the paper width guide left
-
Load one or more envelopes into the far-right side of the input tray. Insert the envelopes with the print-side facing up and the flap-side facing down against the tray.
-
If the envelope flap is on the long edge of the envelope, insert the envelope with the flap-side positioned to the left.
-
If the envelope flap is on the short edge, insert the envelope with the flap-side positioned up, to the top.
Figure : Envelope Flap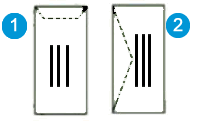
-
Envelope with flap on short edge
-
Envelope with flap on long edge
Figure : Loading Envelopes
CAUTION:
Do not load envelopes while the printer is printing. Jams or paper feed issues might occur. -
-
Slide the paper width guide to the right until it stops at the edge of the envelopes.Figure : Sliding the paper width guide right

-
Pull out the output tray, and then raise the tray extender.Figure : Pulling out the output tray, and then raising the tray extender

https://support.hp.com/


Comments
Post a Comment