HP DeskJet GT 5810, 5820 Printers - E4 Error (Paper Jam)
HP DeskJet GT 5810, 5820 Printers - E4 Error (Paper Jam)
This document is for HP DeskJet GT 5810, 5811, 5820, 5821, and 5822
All-in-One printers.
The printer stops feeding pages, the control panel displays an
alternating E and 4, and the Error icon, Paper Error icon,
and Resume light blink. This indicates that paper might be jammed
inside the printer.
Paper jams can be real or false. The printer might report a paper jam even
when there is no jammed paper. The following steps apply to both real and
false paper jams.
Step 1: Look for jammed paper
Paper jams can occur in multiple areas of the printer. If you cannot find
the paper jam in one area, continue to the next area until the jam is
located.
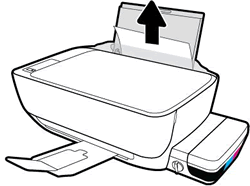
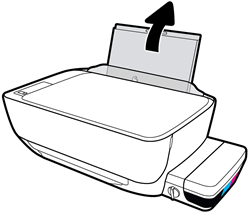
Clear jammed paper from the input tray
Remove any jammed paper that is accessible from the input tray area.
-
Press the Cancel button to try and automatically clear the paper jam.If the paper jam error persists, continue these steps to manually clear the jam.
-
Gently remove any jammed paper and bits of torn paper from the input tray. To avoid tearing any whole sheets of paper, pull the paper with both hands.
-
Shine light from a flashlight inside the input tray opening and look for torn pieces of paper that remain inside the printer. Remove any paper you find to prevent more jams.
-
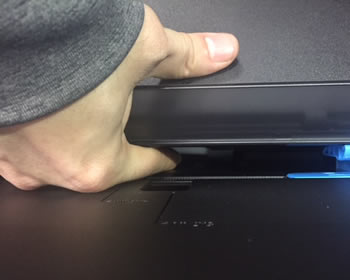
Use your fingers to move the pick mechanism located inside the input tray and look for any foreign objects or debris that might have fallen inside the printer. Remove any foreign objects you find to prevent more jams.
-
Reload the input tray with new paper.
-
Press the Resume button on the printer control panel to continue the current print job.
If the error persists, check for jammed paper in another area of
the printer.
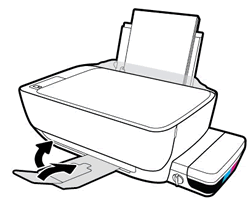
Clear jammed paper from the output tray
Remove any jammed paper from the output tray.
-
Press the Cancel button
 to try and automatically clear the paper jam.
If the paper jam error persists, continue these steps to manually clear the jam.
to try and automatically clear the paper jam.
If the paper jam error persists, continue these steps to manually clear the jam. -
Gently remove any jammed paper and bits of torn paper from the output tray. To avoid tearing any whole sheets of paper, pull the paper with both hands.

-
Shine light from a flashlight inside the output tray opening and look for torn pieces of paper that remain inside the printer. Remove any paper you find to prevent more jams.
-
Press the Resume button on the printer control panel to continue the current print job.
If the error persists, check for jammed paper in another area of
the printer.
Clear jammed paper from the printhead access area
Remove any loose or jammed paper that is accessible from the printhead
access area.
-
Press the Cancel button to try and automatically clear the paper jam.
If the paper jam error persists, continue these steps to manually clear the jam.
-
Turn off the printer, and then disconnect the power cord.
WARNING:
Disconnect the power cord before reaching inside the printer to avoid risk of injuries or electric shock. -
Disconnect the USB cable from the rear of the printer, if it is connected.
-
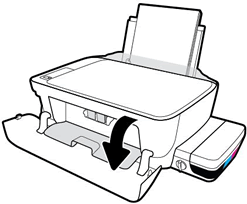
Close the output tray extender, and then push the output tray into the printer.
-
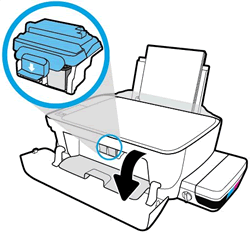
Open the exterior door, and then open the printhead access door.
-
If the carriage is in the center of the printer, gently slide it to the right.
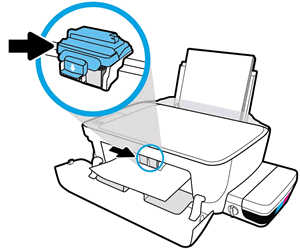
CAUTION:
Do not touch the printhead latch when moving the carriage. Accidentally opening the latch can result in damage to the ink system.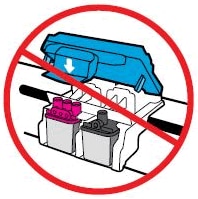
-
Gently remove any jammed paper from inside the printer.
-
Shine light from a flashlight inside the printhead access area and look for torn pieces of paper that remain inside the printer. Remove any paper you find to prevent more jams.
-
Close the printhead access door.
-
Close the exterior door.
-
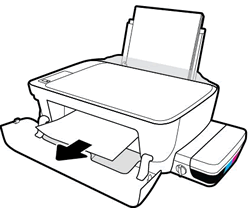
Pull out the output tray, and then the tray extender.

-
Reconnect the power cord to the rear of the printer, and then turn on the printer.
-
Turn on the printer.
Try to print. If the error persists, check for jammed paper in
another area of the printer.
Clear jammed paper from underneath the printer
Only perform these steps if printer continues to report a paper jam
after clearing jammed paper from the input and output trays and
printhead access area.
These steps require turning the printer on its back, and might result
in ink leakages.
-
Press the Cancel button to try and automatically clear the paper jam.
If the paper jam error persists, continue these steps to manually clear the jam.
-
Turn off the printer, and then disconnect the power cord.
WARNING:
Disconnect the power cord before reaching inside the printer to avoid risk of injuries or electric shock. -
Disconnect the USB cable from the rear of the printer, if it is connected.
-
Lower the paper input tray back into the printer, close the output tray extender, and then push the output paper tray into the printer.
-
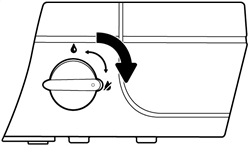
Lock the ink valve.
-
Make sure the ink tank plugs are inserted and secure.

-
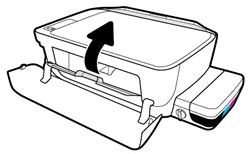
While using one hand to hold the scanner lid, slowly lift the printer, and then rest it on its back so that you can access its underside (base).
CAUTION:
Do not turn the printer on its side! Turning the printer on its right or left side can cause ink to leak. -
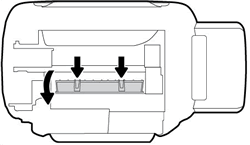
Pull the tabs on either side of the cleanout door to open it.
-
Gently remove any jammed paper and from inside the printer.

-
Shine light from the flashlight inside the opening and look for torn pieces of paper or foreign objects that remain inside the printer. Remove any paper or foreign objects you find to prevent more jams.
-
Close the cleanout door. Gently push the door forward until it snaps into place.

-
Return the printer to its normal position.
-
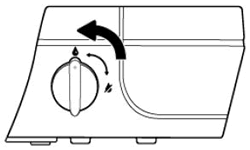
Unlock the ink valve.
-
Reconnect the USB cable if necessary.
-
Reconnect the power cord to the rear of the printer, and then turn on the printer.
Try to print. If the error persists, check for jammed paper in
another area of the printer.
If you have checked and removed any jammed paper from each printer area
and the error persists, continue to the next step.
Step 2: Make sure the carriage moves freely
To make sure there are no foreign objects or paper in the printer, move
the carriage across the width of the printer.
-
Turn on the printer, if it is not already on.
-
Open the exterior door, and then open the printhead access door.
-
Wait until the carriage is idle and silent before you continue.
-
With the printer turned on, disconnect the power cord from the rear of the printer.
WARNING:
You must unplug the power cord to move the carriage by hand and reset the paper feed mechanism without the risk of electrical shock. -
Use a flashlight to check for any paper or objects that might be restricting the carriage, and then remove any paper or objects that you find.
CAUTION:
If the paper tears when you remove it from the rollers, check the rollers and wheels for torn pieces of paper that might remain inside the printer. If pieces of paper remain in the printer, more paper jams can occur. -
Reach inside the printer through the printhead access door, and then manually move the carriage.
-
If the carriage is stuck on the right side of the printer, move the carriage to the left side of the printer.
-
If the carriage is stuck on the left side of the printer, move the carriage to the right side of the printer.
-
If the carriage is stuck in the middle of the printer, move the carriage to the right side of the printer.
CAUTION:
Do not touch the printhead latch when moving the carriage. Accidentally opening the latch can result in damage to the ink system.
-
-
Remove any loose paper or obstructions you find.
-
Make sure the carriage can move freely across the width of the printer. Firmly push the carriage to the left side of the printer, and then to the right side.
-
Close the printhead access door, and then close the exterior door.
-
Reconnect the power cord to the rear of the printer, and then turn on the printer.
Try to print. If the error persists, continue to the next step.
Step 3: Clean the paper rollers
Use an automated utility to clean the paper feed rollers inside the
printer.
-
Turn on printer.
-
Remove paper from the input tray.
-
Press and hold the Power button, press the Cancel buttonthree times, press the Start Copy Color
button
 seven times, and then release the Power
button.
The printer makes mechanical noises. Wait until the printer is idle and silent before you proceed.
seven times, and then release the Power
button.
The printer makes mechanical noises. Wait until the printer is idle and silent before you proceed.
Try to print. If the error persists, continue to the next step.
Step 4: Clean ink smears
Cleaning ink smears can help clear paper jams and optimize print quality.
-
Press and hold the Power button, press the Cancel buttonthree times, press the Start Copy Color
button eight times, and then release the Power
button.
The printer feeds one page slowly and makes mechanical noises.
-
Wait until the printer is idle and silent before you proceed.
Try to print. If the error persists, continue to the next step.
Step 5: Manually clean the paper rollers inside the input tray area
Dust, paper fiber, and other debris might accumulate on the paper feed
rollers and cause paper jams and paper feed issues.
-
Turn off the printer, and then disconnect the power cord.
WARNING:
Disconnect the power cord before reaching inside the printer to avoid risk of injuries or electric shock. -
Disconnect the USB cable, if it is connected.
-
Raise the input tray.
-
Lift and hold the input tray shield.
NOTE:
Do not remove the input tray shield. The input tray shield prevents foreign debris from falling into the paper path and causing paper jams. -
Use a flashlight to look through the open input tray and find the gray paper pick rollers.
-
Dampen a long cotton swab with bottled or distilled water, and then squeeze any excess water from the swab.
-
Press the swab against the rollers, and then rotate them upward with your fingers. Apply a moderate amount of pressure to remove dust or dirt buildup.
-
Lower the input tray shield.
-
Allow the rollers to dry (approximately 10 minutes).
-
Reconnect the USB cable to the printer if necessary.
-
Reconnect the power cord to the rear of the printer, and then turn on the printer.
Try to print. If the error persists, continue to the next step.
Step 6: Reset the printer
Sometimes a paper jam error persists even though there is no jammed paper
(false paper jam). Reset the printer, which might clear a false paper jam
error.
-
With the printer turned on, disconnect the power cord from the printer.
-
Unplug the power cord from the power source.
-
Wait 60 seconds.
-
Reconnect the power cord to a wall outlet and to the printer.
NOTE:
HP recommends plugging the printer directly into a wall outlet.
Try to print. If the error persists, continue to the next step.
Step 7: Service the printer
Service or replace your HP product if the issue persists after completing
all the preceding steps.
https://support.hp.com/


Comments
Post a Comment